SSD训练数据集做客流检测

Windows下使用spyder训练SSD-TensorFlow,并进行客流检测

背景

  • 之前的尝试中,用yolo v3训练自己的模型并进行客流检测。得到的结果其实已经很好,增加训练样本和训练周期,最后也取得了如下的效果,但是实际在视频中检测时候,抖动现象还是比较严重的。
![yolo结果](https://raw.githubusercontent.com/AllentDan/PedestrianDetection/master/yoloImage/result.png)
  • 尝试使用另一种实时检测模型SSD,SSD综合了yolo的快捷和Faster RCNN的准确,同时兼备快捷和准确率。

过程

  1. 先后参考博客一博客二博客三以及对SSD迁移到TensorFlow上的工程。其中第三篇博客对我帮助很大,主要是SSD-TensorFlow都是部署在Linux上,或者在windlows使用pycharm的IDE工具,所以对使用其他工具和环境的造成许多困扰。

  2. 可以完全按照第二篇博客一步一步向下做,直到第七步。因为不是使用的pycharm,导致无法直接转换文件生成tfrecord。就做了些修改,将linux下的.sh批处理文件改成Windows下的.bat批处理文件。文件内如如下:

    1
    2
    3
    4
    5
    6
    python tf_convert_data.py ^
    --dataset_name pascalvoc ^
    --dataset_dir VOCdevkit/VOC2007/ ^
    --output_name voc_2007_train ^
    --output_dir tfrecords/
    pause

    读者可以新建TXT文件,然后输入上面内容,换成自己对应的路径,再修改文件名.txt为.bat文件。直接双击运行即可,报错的话,根据内容修改即可。

  3. 同样,受限于Windows环境和IDE的辣鸡,只好自己编写.bat批处理文件,内如如下:

    1
    2
    3
    4
    5
    6
    7
    8
    9
    10
    11
    12
    13
    14
    python train_ssd_network.py ^
    --train_dir log2/ ^
    --dataset_dir tfrecords/ ^
    --dataset_name pascalvoc_2007 ^
    --dataset_split_name train ^
    --model_name ssd_300_vgg ^
    --checkpoint_path checkpoints/VGG_VOC0712_SSD_300x300_ft_iter_120000.ckpt ^
    --save_summaries_secs 60 ^
    --save_interval_secs 300 ^
    --weight_decay 0.0005 ^
    --optimizer adam ^
    --learning_rate 0.00003 ^
    --batch_size 16
    pause

    同样,参照上一个过程做你自己的修改,然后双击运行.bat文件即可,报错修改。训练过程中想终止,按Ctr+C即可。

问题

  • 问题:训练不收敛,导致很容易像博客一中存在的问题。此外,我本人的训练不收敛情况严重许多,loss可以在10~150间抖动震荡。但是最后测试图片的时候,仍然像第一篇参考博客一样。
  • 办法:后面将所有的图片按最大可能生成tfrecords文件,并且增多图片数量和训练次数。中间还做了其他修改,但是已经忘记了,可以自行尝试。

结果
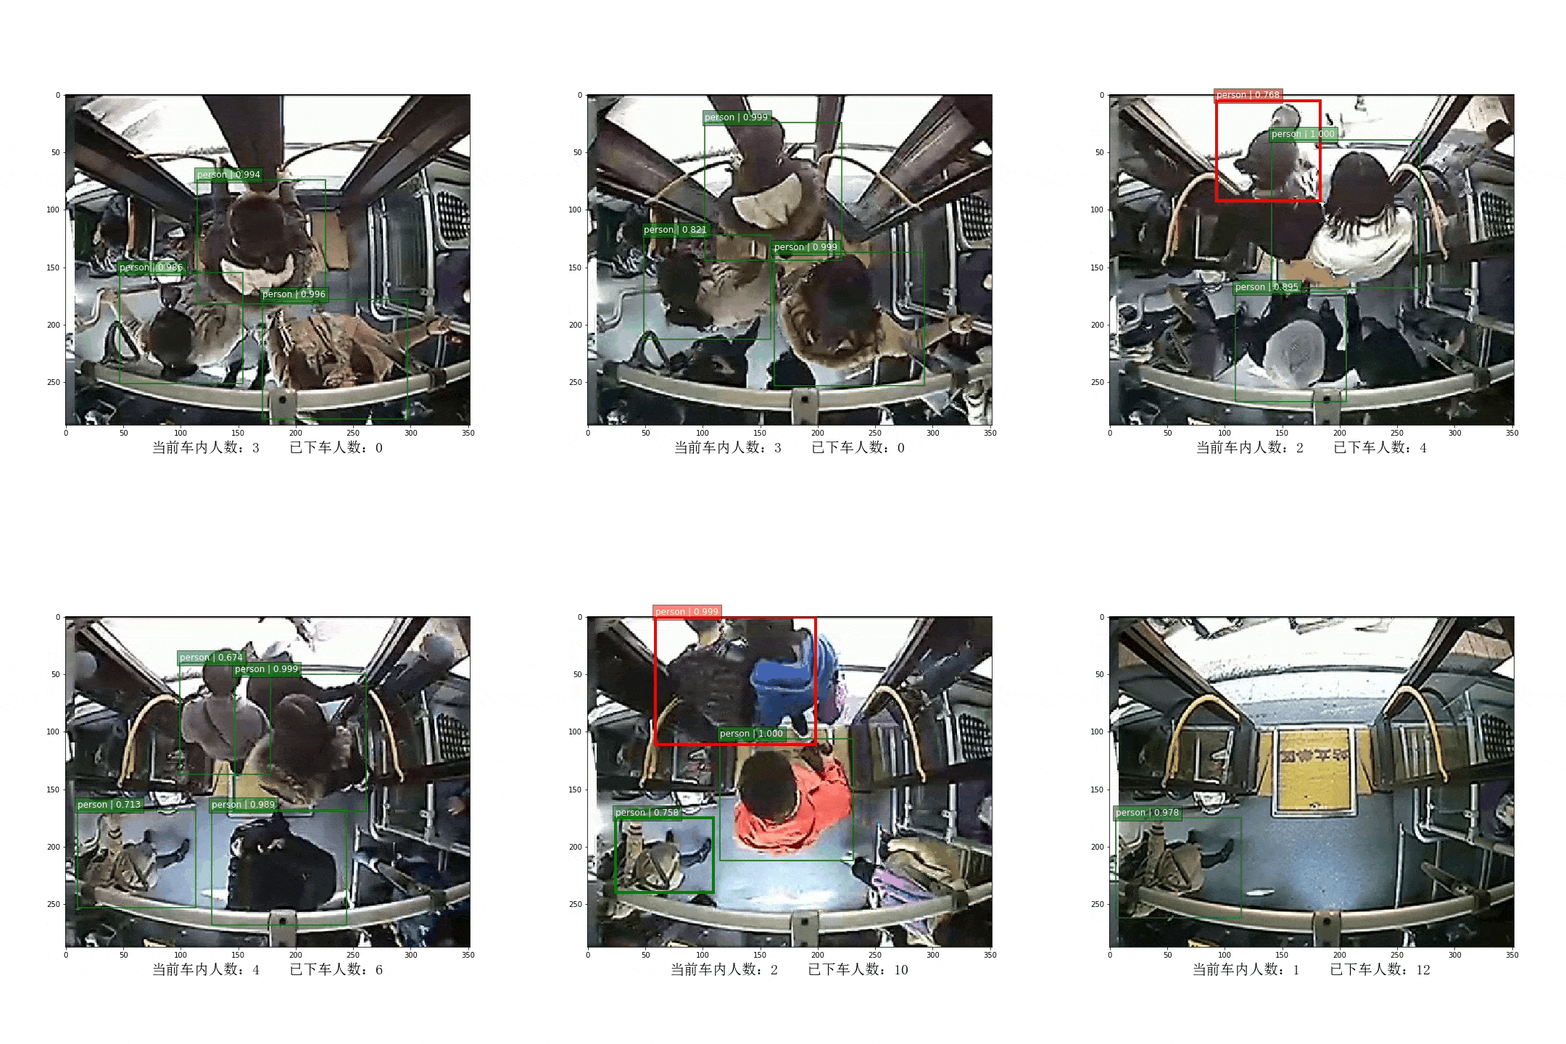
![GIF](https://raw.githubusercontent.com/AllentDan/ImageBase/main/detection/mytest6.gif)

补充

  • 动图是因为调试数人数的时候,需要一幅图片一幅图片地测试。所以用imageio将几百张图片生成了GIF
  • 考虑到SSD检测效果是比较稳定的,就不做目标跟踪,直接对检测到的人物框处理。
  • 思想就是,下车的人对应的框的位置是相对集中的。所以统计方框的中心点的位置,可以是中心点到原点的欧氏距离,也可以是其他距离。此外,还存在某些人下车不够顺,所以不能直接用方框的y坐标位置,就对y减小到一定值开始算该人下车,当出现该人的框往回时候,又将该人视为上车。以此统计人数,具体仍然有很多细节,就直接贴代码吧。

代码

1
2
3
4
5
6
7
8
9
10
11
12
13
14
15
16
17
18
19
20
21
22
23
24
25
26
27
28
29
30
31
32
33
34
35
36
37
38
39
40
41
42
43
44
45
46
47
48
49
50
51
52
53
54
55
56
57
58
59
60
61
62
63
64
65
66
67
68
69
70
71
72
73
74
75
76
77
78
79
80
81
82
83
84
85
86
87
88
89
90
91
92
93
94
95
96
97
98
99
100
101
102
103
104
105
106
107
108
109
110
111
112
113
114
115
116
117
118
119
120
121
122
123
124
125
126
127
128
129
130
131
132
133
134
135
136
137
138
139
140
141
142
143
144
145
146
147
148
149
150
151
152
153
154
155
156
157
158
159
160
161
162
163
164
165
166
167
168
169
170
171
172
173
174
175
176
177
178
179
180
181
182
183
184
185
186
187
188
189
190
191
192
193
194
195
# -*- coding: utf-8 -*-
"""
Created on Wed Jun 19 10:13:53 2019

@author: admin
"""


import os

import math

import random


import numpy as np

import tensorflow as tf

import cv2


slim = tf.contrib.slim

import matplotlib.pyplot as plt

import matplotlib.image as mpimg

import sys

sys.path.append('../')

from nets import ssd_vgg_300, ssd_common, np_methods
from preprocessing import ssd_vgg_preprocessing
from notebooks import visualization

# TensorFlow session: grow memory when needed. TF, DO NOT USE ALL MY GPU MEMORY!!!
gpu_options = tf.GPUOptions(allow_growth=True)

config = tf.ConfigProto(log_device_placement=False, gpu_options=gpu_options)

isess = tf.InteractiveSession(config=config)

# Input placeholder.

net_shape = (300, 300)

data_format = 'NHWC'

img_input = tf.placeholder(tf.uint8, shape=(None, None, 3))

# Evaluation pre-processing: resize to SSD net shape.

image_pre, labels_pre, bboxes_pre, bbox_img = ssd_vgg_preprocessing.preprocess_for_eval(

img_input, None, None, net_shape, data_format, resize=ssd_vgg_preprocessing.Resize.WARP_RESIZE)

image_4d = tf.expand_dims(image_pre, 0)


# Define the SSD model.

reuse = True if 'ssd_net' in locals() else None

ssd_net = ssd_vgg_300.SSDNet()

with slim.arg_scope(ssd_net.arg_scope(data_format=data_format)):

predictions, localisations, _, _ = ssd_net.net(image_4d, is_training=False, reuse=reuse)


# Restore SSD model.

ckpt_filename = 'E:\\Python\\ssd\\log2\\model.ckpt-3380'

# ckpt_filename = '../checkpoints/VGG_VOC0712_SSD_300x300_ft_iter_120000.ckpt'

isess.run(tf.global_variables_initializer())

saver = tf.train.Saver()

saver.restore(isess, ckpt_filename)


# SSD default anchor boxes.

ssd_anchors = ssd_net.anchors(net_shape)


# Main image processing routine.

def process_image(img, select_threshold=0.65, nms_threshold=.15, net_shape=(300, 300)):

# Run SSD network.

rimg, rpredictions, rlocalisations, rbbox_img = isess.run([image_4d, predictions, localisations, bbox_img],

feed_dict={img_input: img})


# Get classes and bboxes from the net outputs.

rclasses, rscores, rbboxes = np_methods.ssd_bboxes_select(

rpredictions, rlocalisations, ssd_anchors,

select_threshold=select_threshold, img_shape=net_shape, num_classes=21, decode=True)


rbboxes = np_methods.bboxes_clip(rbbox_img, rbboxes)

rclasses, rscores, rbboxes = np_methods.bboxes_sort(rclasses, rscores, rbboxes, top_k=400)

rclasses, rscores, rbboxes = np_methods.bboxes_nms(rclasses, rscores, rbboxes, nms_threshold=nms_threshold)

# Resize bboxes to original image shape. Note: useless for Resize.WARP!

rbboxes = np_methods.bboxes_resize(rbbox_img, rbboxes)

return rclasses, rscores, rbboxes

def plt_bboxes(img, classes, scores, bboxes, pathIndex,out, figsize=(10,10), linewidth=1.5):
"""Visualize bounding boxes. Largely inspired by SSD-MXNET!
"""
fig = plt.figure(figsize=figsize)
fig=plt.gcf
plt.imshow(img)
height = img.shape[0]
width = img.shape[1]
colors = dict()
outnum=0
for i in range(classes.shape[0]):
cls_id = int(classes[i])
if cls_id >= 0:
score = scores[i]
if cls_id not in colors:
colors[cls_id] = (random.random(), random.random(), random.random())
ymin = int(bboxes[i, 0] * height)
xmin = int(bboxes[i, 1] * width)
ymax = int(bboxes[i, 2] * height)
xmax = int(bboxes[i, 3] * width)
color="green"
if ymin+ymax<132:
outnum=outnum++1
color="red"
linewidth=4
rect = plt.Rectangle((xmin, ymin), xmax - xmin,
ymax - ymin, fill=False,
edgecolor=color,
linewidth=linewidth)
plt.gca().add_patch(rect)
class_name = "person"
plt.gca().text(xmin, ymin - 2,
'{:s} | {:.3f}'.format(class_name, score),
bbox=dict(facecolor=color, alpha=0.5),
fontsize=12, color='white')
plt.xlabel("当前车内人数:"+str(len(bboxes)-outnum)+" 已下车人数:"+str(out),fontproperties="SimSun",size=20)
plt.savefig(pathIndex)
# plt.show()
path = 'E:/Python/opencv/test2/'
image_names = sorted(os.listdir(path))
previous=["start"]
out=0
distance_list=[0,0,0,0,0,0,0,0,0,0,0,0]
thresh=132/288#判断该乘客是否下车的阈值,该值表示y方向距离
thresh_ychange=0.4#y方向的跳动,因为检测到的人物框是有抖动的,可以后面自行增加限制条件
for image_name in image_names:
img = mpimg.imread(path+image_name)
rclasses, rscores, rbboxes = process_image(img)
now=[]#存储当前帧
for i in rbboxes:
now.append({"distance":i.sum(),"y":i[0]+i[2]})
now=sorted(now, key=lambda now : now["distance"])
if previous==["start"]:
previous=now
continue
else:
for m,n in enumerate(now):
if m<len(previous):
if n["y"]<thresh and previous[m]["y"]>thresh:
out=out+1
elif n["y"]>thresh and previous[m]["y"]<thresh and n["y"]-previous[m]["y"]<thresh_ychange:
out=out-1
previous=now
plt_bboxes(img,rclasses, rscores, rbboxes, path+'out_'+image_name,out)