前面的章节中我们介绍了libtorch的环境搭建(VS和Qt),libtorch张量常用操作,简单的MLP,CNN和LSTM模型搭建,以及数据加载类的使用。本章将以图像分类任务为例,详细介绍如何使用c++训练一个图片分类器。
模型
本文以VGG为例,对比pytorch下的模型搭建和训练,阐述Libtorch的模型搭建,模型加载预训练(from ImageNet)权重。VGG模型是2014年的ImageNet分类冠军,由于后续深度学习的发展,添加了一些成分,如BatchNorm,形成一些新变种。本文以vgg16bn为例作介绍,vgg16bn就是vgg16加上了后续提出的BatchNorm层。
分析模型
首先介绍pytorch的模型源码,pytorch的torchvision.models.VGG中有提供官方的VGG模型代码。直接复制上来分析:
1 | class VGG(nn.Module): |
和现在的复杂模型相比,VGG模型结构较为简单,就是简单的多次卷积+下采样堆叠,后接一个三层的MLP。代码中VGG模型类有三个成员函数,一个初始化函数__init__,一个前向传播函数forward,最后一个权重初始化函数。类外部有一个函数make_layers函数用于生成CNN主干,返回一个nn.Sequential对象。
打开python编辑器(or IDE,默认有pytorch编程经验)。输入下面代码:
1 | from torchvision.models import vgg16,vgg16_bn |
发现打印出模型每一层(有权重的层,不包括类似激活函数层)的名称。打印的层名称如下:
1 | features.0.weight |
还行,不是很长。这步操作对后续模型搭建和加载权重很重要,因为torch的模型加载必须要有一一对应的权重层的名称。如果代码中的模型和加载路径对应的权重提供的权重层名称不一致,就会产生错误。
分析模型打印的名称,其实就会发现只有features,classifier,weight和bias和数字。联系前面的官方代码的初始化函数__init__,函数内部有self.classifer和self.features,就很容易得出pytorch模型的内部层名称命名规律了。weight和bias对应conv层里的self.conv和self.bias。点和数字表示nn.Sequential里的序号。
搭建模型
下面在c++中搭建一个和pytorch下完全一致的vgg16bn。如果不一致的话其实不影响正常的模型训练和预测,但是影响初始化状态,模型加载从ImageNet数据集训练好的权重以后,训练收敛的速度和收敛后的精度都会好很多。
首先是.h文件中要做的,一个conv_options确定卷积超参数,因为常用所以inline一下。maxpool_options函数确定MaxPool2d的超参数。如何定义一个和pytorch一致的make_features函数,再在VGG类中声明和pytorch一致的初始化和前向传播函数。最后则是一个vgg16bn函数,返回vgg16bn模型。
1 | //和前面章节一致,定义一个确定conv超参数的函数 |
然后在.cpp文件中定义好.h文件中的声明。.cpp文件的内容如下:
1 | torch::nn::Sequential make_features(std::vector<int> &cfg, bool batch_norm){ |
由于c++中元组如果太长的话声明也会很长,而列表或者vector只接受同类型的数据,就将原来pytorch中的cfg里的’M’改成-1。在读取cfg时判断由原来的’M’变成判断是否-1即可。
需要注意的是,给模型不同层命名时,代码里只出现了register_module对features和classifier命名,这和pytorch保持一致。
利用预训练权重
下面查看我们c++定义的模型是否和pytorch完全一致。在主函数中实例化一个VGG的对象,然后打印各个层的名称,代码如下:
1 | std::vector<int> cfg_16bn = {64, 64, -1, 128, 128, -1, 256, 256, 256, -1, 512, 512, 512, -1, 512, 512, 512, -1}; |
可以发现,各个层名称和pytorch中的模型内部层的名称完全一致。这样我们将pytorch的模型权重保存下来,然后加载到c++中。
保存pytorch模型的权重不能直接用torch.save保存模型,这样存下来的模型不能被c++加载。我们利用部署时常用的torch.jit.script模型来保存。python的保存权重代码如下:
1 | import torch |
这样,模型的卷积层,归一化层,线性层的权重就保存到.pt文件中了。下面尝试加载到c++中。c++中的加载代码较为简单,直接在定义好的vgg16bn模型后面加载试试:
1 | std::vector<int> cfg_16bn = {64, 64, -1, 128, 128, -1, 256, 256, 256, -1, 512, 512, 512, -1, 512, 512, 512, -1}; |
如果编译运行到下面的函数中中断,则可能原因有:
- 模型保存错了,无法正确加载
- 路径不对,没正确指向(可能非常大)
- c++中定义的模型和python中定义的不一致,最好打印下来,复制到文件中对比文档。正常运行过了一般就代表模型已经成功加载了。
1
2
3
4
5
6template <typename Value, typename... LoadFromArgs>
void load(Value& value, LoadFromArgs&&... args) {
serialize::InputArchive archive;
archive.load_from(std::forward<LoadFromArgs>(args)...);
archive >> value;
}
数据加载
和第四章一样,本章还是使用pytorch官网提供的昆虫分类数据集。下载解压后有train和val文件夹,里面分别有两类昆虫图片。数据加载模块代码和上一章一致,就不重复了,感兴趣的往前面博客翻。
封装
声明
解决了基本的模型定义和加载,数据加载等问题,下面就可以定义一个Classifier类了。这个类的功能主要有:
- 初始化:在初始化中完成模型挂载,是cpu还是某个gpu;定义好分类器并加载预训练的权重,实现更好更快训练。
- 训练:可以指定分类器训练的周期数,训练的batch_size,学习率以及模型保存的路径。
- 预测:传入图片就可以返回分类器预测的类别。
- 加载权重。
类的声明很简单:
1 | class Classifier |
定义
类的成员函数定义较为复杂:
1 | void Classifier::LoadWeight(std::string weight){ |
LoadWeight没太多要讲的,很简单的加载模型并置为eval()。需要注意的是初始化和训练函数,初始化函数由于模型最后一层的num_class不定,所以不能直接加载之前保存的权重。而训练函数要分别用train和val,并且要注意损失设置等。
初始化
首先是初始化函数,初始化函数首先先定义一个num_class对应的分类器vgg16bn,然后定义一个num_class=1000的vgg16bn。加载时加载后者,然后将权重拷贝至前者中。拷贝过程非常精华,需要读者细细揣摩。除了拷贝参数,初始化还会定义好加载到gpu_id对应的GPU上,或者设置gpu_id小于0加载到cpu上。
1 | Classifier::Classifier(int gpu_id) |
训练
然后是训练函数,训练函数分别使用train_loader和val_loader,前者加载train文件夹下的图片训练,后者用于评估。训练过程定义好优化器,损失函数等。
1 | void Classifier::Train(int num_epochs, int batch_size, float learning_rate, std::string train_val_dir, std::string image_type, std::string save_path){ |
预测
最后是预测,返回类别ans,中间计算置信度prob。
1 | int Classifier::Predict(cv::Mat& image){ |
末尾贴一个训练时的图: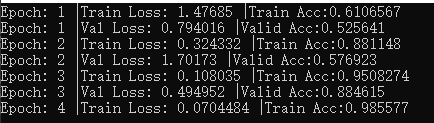 。
。
训练时的参数设置如下:
1 | std::string vgg_path = "your path to vgg16_bn.pt"; |
其实,周期数设置300时,前面很多个周期都在做固定CNN的迁移学习(or finetune)。可以设置小一些查看直接训练全部模型会怎样,以及思考为何会这样。
至此,libtorch初级教程已经完成,坑很多,作者已经为你踩好,更高级的部分在准备中。
分享不易,如果有用请不吝给我一个👍,转载注明出处:https://allentdan.github.io/
代码见LibtorchTutorials