阅读本文需要有基础的pytorch编程经验,目标检测框架相关知识,不用很深入,大致了解概念即可。
本章简要介绍如何如何用C++实现一个目标检测器模型,该模型具有训练和预测的功能。本文的分割模型架构使用yolov4-tiny结构,代码结构参考了bubbliiiing yolov4-tiny,本文分享的c++模型几乎完美复现了pytorch的版本,且具有速度优势,30-40%的速度提升。
模型简介
简单介绍一下yolov4-tiny模型。yolov4-tiny模型是YOLO(you only look once)系列模型中,version 4的轻巧版,相比于yolov4,它牺牲了部分精度以实现速度上的大幅提升。yolov4_tiny模型结构如图(图片来源自这):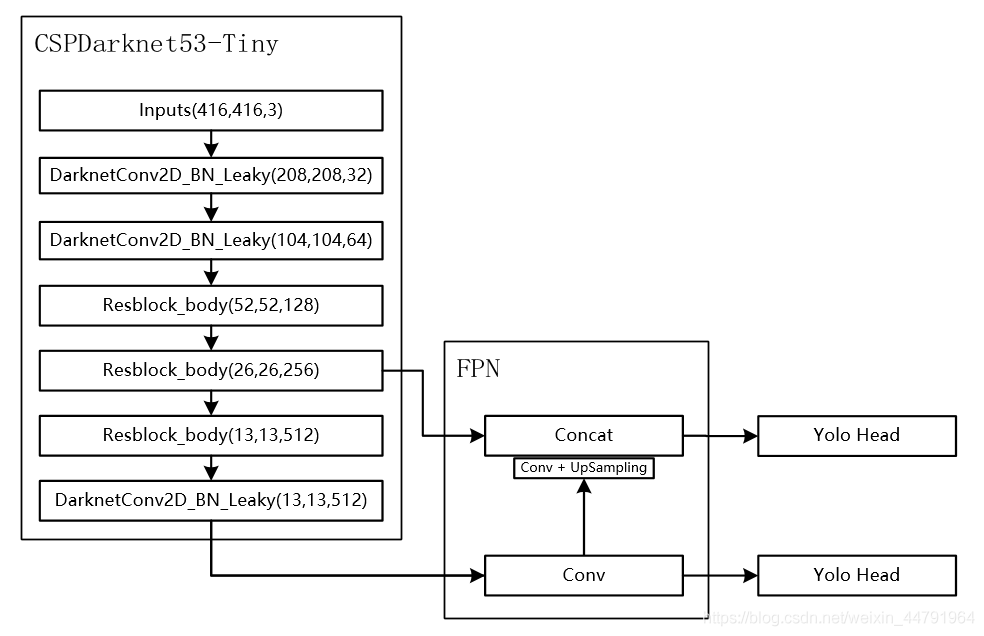
可以发现模型结构非常简单,以CSPDarknet53-tiny为骨干网络,FPN为颈部(neck),Yolo head为头部。最后输出两个特征层,分别是原图下采样32倍和下采样16倍的特征图。训练时,以这两个特征图分别输入损失计算中计算损失,再将损失求和(或平均,怎么都好),后做反向传播,预测时将两个特征图解码出的结果做并集再做NMS(非极大值抑制)。
骨干网络
CSPDarknet53-tiny是CSPNet的一种,CSPNet发表于CVPR2019,是用于提升目标检测模型检测性能的一种骨干网络。感兴趣的同学可以去看原文,简单理解该论文贡献,就是将特征层沿着通道维度切成两片,两片分别做不同的卷积,然后再拼接起来,这样做相比于直接对原图做特征提取,能减少计算量。
默认看过我的libtorch系列教程的前部分,直接上代码。首先是基本单元,由Conv2d + BatchNorm2d + LeakyReLU构成。
1 | //Conv2d + BatchNorm2d + LeakyReLU |
该层作为基本模块,将在后期作为搭积木的基本块,搭建yolo4_tiny。
然后是Resblock_body模块,
1 | class Resblock_bodyImpl : public torch::nn::Module { |
最后是骨干网络主体
1 | class CSPdarknet53_tinyImpl : public torch::nn::Module |
至此,yolo4_tiny中的骨干网络已经搭建好。接下来将搭建yolo4_tiny模型。
yolov4_tiny
骨干网络得到的特征图,将经过FPN,需要上采样模块。
1 | //conv+upsample |
然后是yolo_head模块
1 | torch::nn::Sequential yolo_head(std::vector<int> filters_list, int in_filters); |
以及yolo_body
1 | class YoloBody_tinyImpl : public torch::nn::Module { |
代码写到这一步,其实只要细心就会发现基本是对pytorch代码到libtorch的迁移,除了少数bug需要调试,大部分简单迁移到c++即可。可以说是非常简便了。
像前面章节中一样,生成torchscript模型。bubbliiiing yolov4-tiny中有提供一个coco训练版本,通过下述代码生成.pt文件:
1 | import torch |
然后在c++中使用下述代码测试是否能够正确加载:
1 | auto model = YoloBody_tiny(3, 80); |
执行通过即表明加载成功。
预测
预测需要将YOLO4_tiny模型输出的张量进行解码,根据源代码解码函数,写出c++版本的解码函数,此时将发现,libtorch教程第二章的重要性了。
1 | torch::Tensor DecodeBox(torch::Tensor input, torch::Tensor anchors, int num_classes, int img_size[]) |
此外,还需要将输出进行非极大值抑制。参考我的NMS的几种写法写出非极大值抑制函数:
1 | std::vector<int> nms_libtorch(torch::Tensor bboxes, torch::Tensor scores, float thresh) { |
这些函数准备好后,写出预测函数:
1 | void show_bbox_coco(cv::Mat image, torch::Tensor bboxes, int nums) { |
使用VOC数据集中一张图片,测试一下函数准确性。直接将上述代码用于测试.pt文件,如输入下述代码:
1 | cv::Mat image = cv::imread("2007_005331.jpg"); |
使用的图片如下图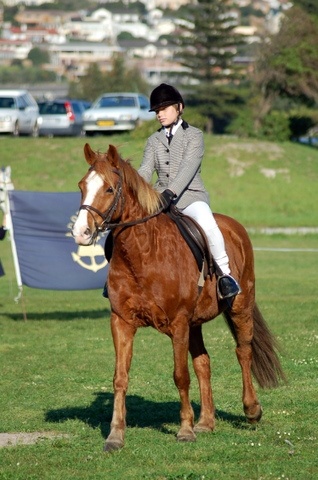
将会发现,预测结果如下: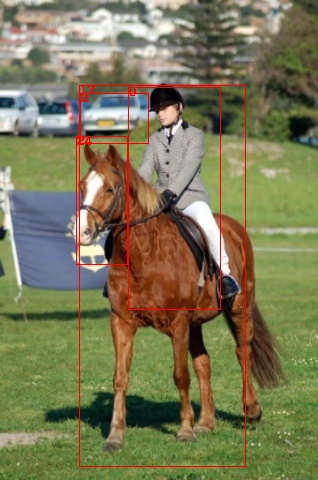
结果分析有以下两点结论:
- 输出了检测框,预测函数大概率正确;
- 存在部分误检,提高置信度阈值可能改善,但是会漏检。这是由于.pt文件训练时采用的预处理策略,和本文代码预测时采用的预处理策略不一致导致的。
使用训练和预测一致的预处理方式处理图片,得到的结果应该要好很多。下面时一张,以coco预训练权重做迁移学习,只训练yolo_head,训练voc数据集一个周期后,预测该图的效果: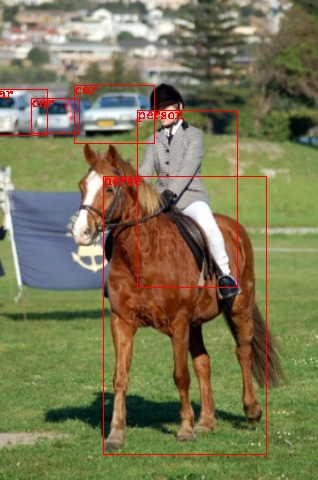
继续训练,数据增强,训练全部权重应该可以将结果提升更多。
训练
训练代码比较多,博客就不再介绍。可以移步到LibtorchTutorials中。同时,LibtorchTutorials中的代码实现的功能都比较基础,我将分开在LibtorchSegment项目和LibtorchDetection中将功能提升完善。有帮助到的话请点个star资瓷下。
分享不易,如果有用请不吝给我一个👍,转载注明出处:https://allentdan.github.io/
代码见LibtorchTutorials